Cutting Tools
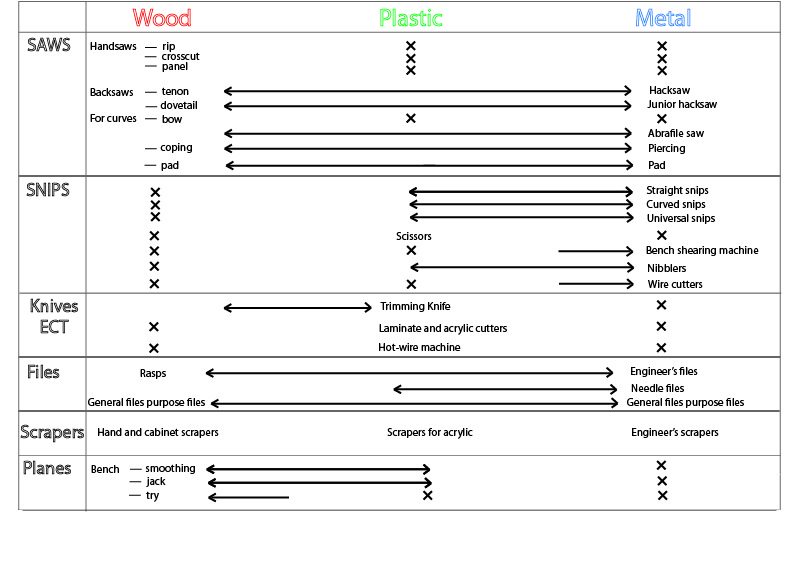
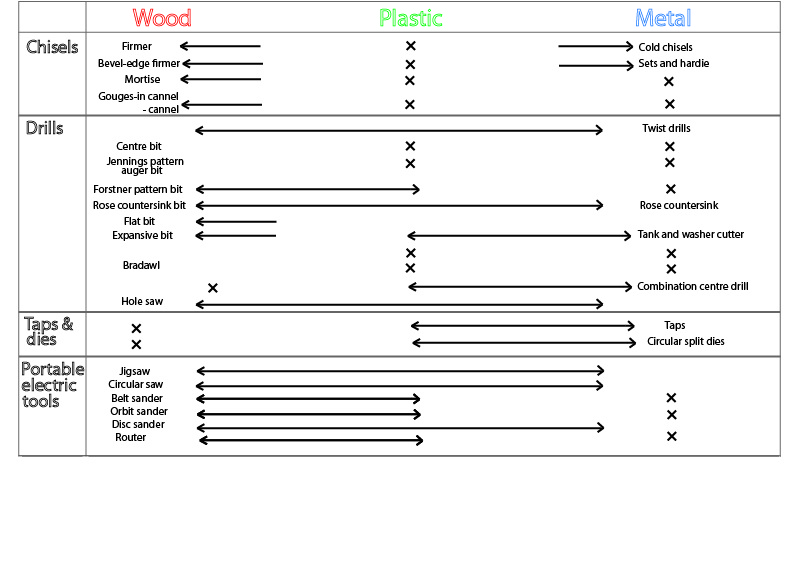
A cutting tool can apply to any tool that is used to remove material from a piece of material by means of shear deformation. There are many different types of cutting tools in a workshop, below is a image I have devised to show some common concepts between the tools with the three materials Wood, Plastic and Metal.
During my time on the course I have mainly used Saws, Chisels and Files
Saws
Generally when you saw we have been taught that you would ask yourself common questions before you begin to work with any material in some respect these are common principles and concepts they include:
The three main vital common concepts and principles that you undergo when sawing with any materials are:
1. Arrange the work so that you always saw vertically
2. Support the work firmly and as close as possible to the kerf
3. Stand correctly and grip the saw
The following common methods are used in schools with Saws:
To cut straight lines with most materials common concepts would be:
For curves cuts with most materials common concepts would be:
Commonly used Saws for each Material:
Common Saws for wood to cut straight lines:
Common Saws for wood for curves:
Common Saws for metal to cut straight lines:
Common Saws for metal for curves:
Common Saws for Plastics to cut straight lines:
Here are a few examples of common misconceptions in schools whilst using a saw:
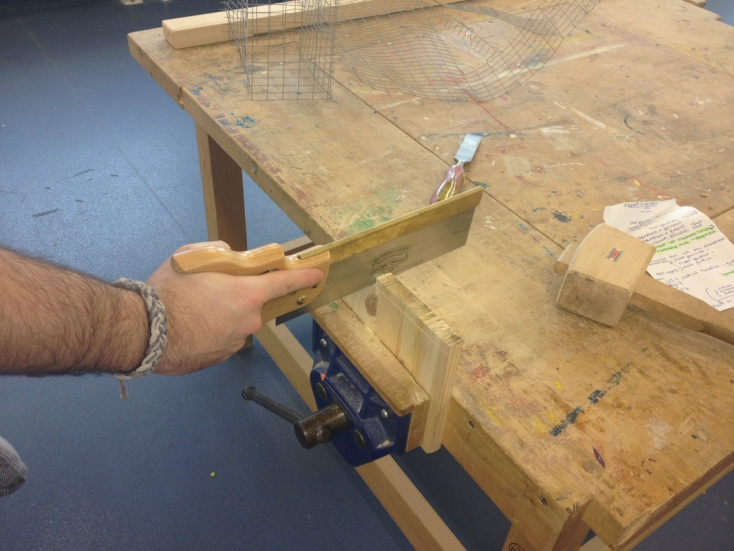
Below is an example of me using a saw within the workshop
Saws
Generally when you saw we have been taught that you would ask yourself common questions before you begin to work with any material in some respect these are common principles and concepts they include:
- Can you clearly see the marking out line ?
- Have you arranged the work so that you can see the piece vertically?
- Have you used a holding tool such as a vice to support your material?
- Are you using the right saw for the right material and process?
- Are you positioned correctly and are you holding the tool right?
The three main vital common concepts and principles that you undergo when sawing with any materials are:
1. Arrange the work so that you always saw vertically
2. Support the work firmly and as close as possible to the kerf
3. Stand correctly and grip the saw
The following common methods are used in schools with Saws:
To cut straight lines with most materials common concepts would be:
- The Grip - Your thumb and first finger guides the saw, the other three fingers will grip the handl
- The Stance - Left foot in line with the saw, right foot slightly behind and apart to give a firm comfortable position.
For curves cuts with most materials common concepts would be:
- The Grip - Use both hands gripping the handle
- The stance - Feet apart. Stand squarely in front of the work
- Preparation - Use your thumb to guide the blade as it is drawn back this will create and start a small starting cu
- Technique - The full length of blade should be used, long steady strokes and release your pressure on the return stroke. The spare hand would be gripping the other end of the saw
- Finishing the cut – The waste material should be supported to prevent it from breaking off before it is cut all the way through.
Commonly used Saws for each Material:
Common Saws for wood to cut straight lines:
- Tenon saw
- Dovetail saw
Common Saws for wood for curves:
- Coping saw
- Bow saw
Common Saws for metal to cut straight lines:
- Hacksaw
- Junior hacksaw
Common Saws for metal for curves:
- Abrafile saw
- Piercing saw
Common Saws for Plastics to cut straight lines:
- Tenon saw
- Dovetail saw
- Hacksaw
- Junior Hacksaw
- Coping saw
- Abrafile saw
- Piercing saw
Here are a few examples of common misconceptions in schools whilst using a saw:
- Often students do not hold the material securely within a holding tool and therefore snap the material – Acyrlic is especially prone to snapping
- Sometimes students think that sawing is quite a noisy process but it will only be noisy if the material is not supported properly and if they are not using the tool properly
- Not holding and using the tool correctly can make it harder to use the saw
- Students do not always cut within the waste, they cut within on the cut line and if the cut is not straight then you have no room to file it down to make it even
- Being able to differentiate the correct saw for the right material is often something student find challenging
Below is an example of me using a saw within the workshop
Chisels
There processes to use a chisel either through Paring, or Mortising, regardless of your method when you use a chisel with a piece of material there are alwayscommon concepts used in schools that you would use these are:
Common types of chisels used in schools
Common types of chisels used with wood:
These are all used for cutting and shaping wood where planes can not be used especially for cutting joints.
Common types of chisel used with metal
These are called cold chisel and are used to cut, shear and chip cold metal.
Common misconceptions using chisels in schools:
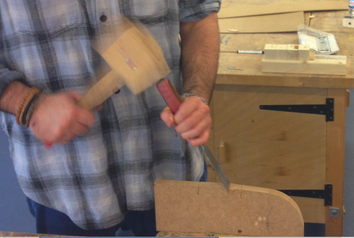
Here is an example of me using a chisel in the workshop
There processes to use a chisel either through Paring, or Mortising, regardless of your method when you use a chisel with a piece of material there are alwayscommon concepts used in schools that you would use these are:
- Hold the tool firmly as they are very sharp tools
- Walk around the workshop sensibly with the tool point downwards
- You would always use the tool at some sort of angle
- A mallet is often used to aid the process depending on what method
- Like any tool a chisel is going to work better if it is sharp but a chisel is in fact safer to use when it is sharper in comparison to when it is blunt
- Regardless of the technique you use, if your chisel slipped whilst using it you would never go to catch it
- You would always sharpen the chisel at a particular angle depending on what method you wish to do. For firmer chisels - the sharpening angle is 30° and the sharpening angle for mortise chisels would be 30°.
- Whatever method you use when using the chisel, you would always have the material supported firmly working away from you – you would never hold the work in your hand.
Common types of chisels used in schools
Common types of chisels used with wood:
- Firmer chisel
- Bevel-edge chisel
- Sash mortise chisel
These are all used for cutting and shaping wood where planes can not be used especially for cutting joints.
Common types of chisel used with metal
- Flat chisel
- Cross-cut or cape chisel
- Diamond point chisel
- Round nose chisel
These are called cold chisel and are used to cut, shear and chip cold metal.
Common misconceptions using chisels in schools:
- Chisels are really sharp and easily cause injury if not used properly
- Often students think that chisels are only used with wood
- Different chisels are used for different methods and sometimes students can use the wrong tool for the wrong purpose
- Sometimes when Mortising students will take too much material from the material which could cause problems later on
- Students sometimes don't check to see if a chisel is sharp, you can do this literally by gentle touching the tip of the tool. If a chisel is blunt not only is it not going to work to it's best but also your forcing it to work which could cause the chisel to slip and either damage your work or yourself.
Here is an example of me using a chisel in the workshop
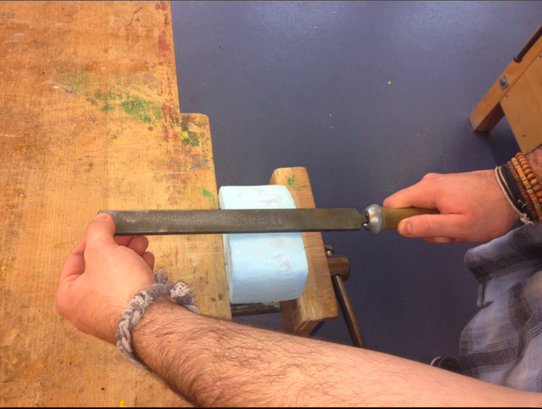
Files
There are many different files that you can use within the workshop which can also be used in various methods. Files are generally very versatile and can be used with most types of materials Wood, Plastic and Metal and other soft materials, these would be called general purpose files which are particularly useful for fling soft materials without clogging.
Regardless of the technique you use with the tool, there are always four main common concepts that you would follow with the file. These three common concepts and principles are as follows:
- Ways of filing: There are two types of filing - Cross-filing and Draw-filing - with Cross-filing the file is moved across the work using the full length of the blade. This rapidly removes material and for for filing lines. This does not leave a smooth finish though. Draw-filing the file is moved sideways along the work and is used to obtain a smooth finish after cross-filing but it does not really remove a great deal of material.
- Holding the file: With Cross-filling - you grip the handle with the thumb along the top and the other hand grips the end between the thumb and the first two fingers, for heavier filing you press down on the end with the ball of your thumb. For Draw-filing you grip across blade with one hand each side of the work and you keep it as close to the work as possible placing thumbs against one edge of the blade your first fingers on top to balance it and the other fingers against the other edge.
- Support: Whatever type of filing you do, you would always support the work as close as possible to where you are going to file with a vice.
- When filing: You use the full length of the blade pressing down on the tool, pushing forward without rocking it and lifting it at the end of the stroke. Pressure is always used to make the file cut.
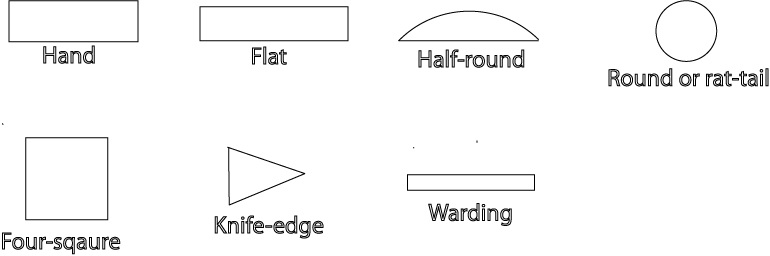
Although there are many different types of files there are always common shapes within files that you tend to see in the workshop and schools the image below displays these common shapes:
Common principles in schools with files:
Common misconceptions in schools with files:
- Each file has a type of grade or cut of the teeth, the grade is visible but you can also tell by touching the tool
- A vice is always used to keep the work secure and supported
- You use normally both hands and keep a firm grip
- Pressure is always used when filing depending on how much material you want to cut
- You always work evenly across the whole surface of the material
- Frequent tests to see if the surface is square and flat
- You use the full length of the blade
Common misconceptions in schools with files:
- Sometimes students will use the wrong type of graded file on a piece of material which in turn cuts too much material then intended
- Work can often not be supported properly using a holding tool and therefore materials are damaged and the methods are not as effective
- Sometimes students will not use the files in the correct way and therefore the tool is not as effective
- Frequently students will think that the faster they file the more material will be removed - this is not always the case
- Students do not always work evenly across the material and therefore the material is uneven
- If students do not display safe practice then more often then not work can be damaged and they can cause serious injury to themselves.
- Here is an example of me using a file on a piece of styro foam.